There are so many ways of tiying you hair warp. In this tutorial, make sure that the hair warp has a wire in inside. That will help you style it and it'll hold your hair better. For the original post and a DIY tutorial for this hair warp go to Kelly Hicks. The tutorial is easy and won't take a lot of time. Have fun with stylin' your chic handmade headbands.
Browse » Home » Archives for July 2012
Stylish Side Ponytail
Now that it's hot everyday we all need a simple stylish hairstyle that we can make without using heat. This is a very quick hair tutorial that I've personally made. Actually the first one I made. My sister Anya has been very helpful and agreed to be my model for this post. We hope you'll like it and be surprised how such a wonderful pony can be made in less that 4 min.
Start by moving your hair to the side that has more hair. Tie it into a low ponytail. Note: if your hair has layers, use a few bobby pins to pin the fallen out parts. Pull the elastic down, just enough to make a hole (see picture 4.). Take the rest of your hair and put it in the hole. After that just tight it and style as you want. Pretty simple, ha?
Preparation: tease the back hair on the top of you head. For more volume read the prev. post, or just use a dry shampoo. After you put on the shampoo leave it like that for a few minutes, or you'll be left wit a powdery mess.
Voluminous Braided Up-do
How to get volume to your hair? That's something that I always ask myself because my hair is stick straight and pretty heavy, so curls can't last long. To get more volume the hair must be airy and you must start making volume from the moment you finished washing your hair. I have a tutorial for that - Blow Dry Basics. So after you've done that, head back here and start this amazing braid crown updo. I found this tutorial on Keiko Lynn, so for more info on how to make this hairstyle go there.
If your hair needs more texture, you can use a dry shampoo. This will make the teasing past a lot easier.
Spray at your roots, lifting as you go. Wait a minute or two and comb it through of else you'll be left with a powdery mess. Then divide your hair into two sections, like you're doing a half updo. back comb underneath the top half and smooth over the top.
Pin the newly teased section (make sure the top layer is smooth, to cover the mess) with a couple bobby pins. You can give the bump a little boost if you want.
Divide your hair into two sections and braid them. You can tie them using a elastic, or leave them loose.
Pull each braid to the opposite side of you head and pin them in place. You can tuck the ends underneath each braid. And that's it! Have fun!
New In: Spring Sweater & DIY Shorts
Hey everyone! I just came back from the town, well more shopping. I was so excited to show you my new soft & a little lacy spring grey sweater. I have loved these kinds of sweaters since I knew for myself. They are very useful. If, let's say spring isn't very warm like expected, or when those summer nights get a little chilly.
A few days ago, I used some old jeans to make this cool shorts that you see. It took me less than 5 min to make it . And I know that mostly all of you know the simple steps for turning some old jeans into a shorts, but still, if I already photographed it, why not post it?
A few days ago, I used some old jeans to make this cool shorts that you see. It took me less than 5 min to make it . And I know that mostly all of you know the simple steps for turning some old jeans into a shorts, but still, if I already photographed it, why not post it?
As you can see, It's really fluffy & soft. And the dark grey color looks great. It can be worn with a tank underneath, just because it has those little dimples all over it. But it's also very warm, and made of wool. It's just a casual look that i love.
And here's the simple quick DIY project. Using a pen, mark the length of your new shorts. Note: mark it to be a little longer that you want just so you could fold the ends. Cut the jeans by following the line. After that fold the ends - see picture 3. Sew it on the sides so it won't fold back. To secure everything, iron the ends, from the front side and back side. Well that's it, have you made any DIY shorts recently?
Inside Out French Braid & Twist
If you need to go on some important event, and there's a problem. Your hair. How to make it look perfect with enough romantic look and enough sophistication? And plus, if you're having a bad hair day? The answer is very simple - inside out french braid. It'll correct your bad hair day, and the thickness of the hair is not important. My biggest tip is to let it be a little messy. Hairspray is not used here, but if your hair has layers, use some flexible and strong hairspray. Thank you The Beauty Dep. for sharing!
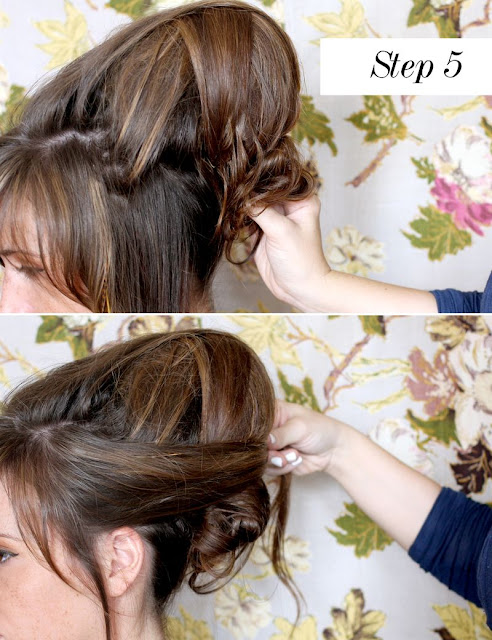
Divide your hair diagonally into 3 sections. Push the 2 side sections in front of your shoulders. Do an inside out french braid. You'll need to go just past the bottom hairline so you'll have the room to tuck the hair under later. Gently and slowly, pull the french braid apart. Keep pulling until it starts to look like "loops". If those with layers have a problem in this part, just use some hairspray and tuck in some loose pieces. Now, tuck in the tail of the braid under and pin it in place (try to use large bobby pins). It should look like this - see photo 5. Next take one of your side pieces and tease them. Then twist and drape it across the back. Pin it and repeat the process on the other side. Add extra bobby pins if you think some parts are loose.
Lazy Top Bun
It's time to play a little with your hair. Try out new looks and techniques, and start with this simple look. Keiko, a beautiful blogger from Keiko Lyinn did this quick, well let's say little loose bun-ponytail hybrid. Why did I choose this tutorial? Well, it's very basic. Playing with high ponytails and volume is a great way to start. As she said in the video, the hair's best texture is day after you wash it. Fell free to take a tour through my blog, and find all kinds of hair tutorials from all over the web. Happy Friday friends!
Planning your wedding? Don't forget that your hair MUST look amazing too!
Contact us today to schedule your free consultation.
rebecca.johnson@hairstylestoremember.com
or
jessica.banda@hairstylestoremember.com
Messy Twist Updo
A quick twist and done. Ivania from Love Aesthetics really made it look so simple. Her unconventional style shines through this hairstyle. And the big earrings, are a great contrast to this low casual hair twist. As she said, she likes when hair looks a little bin neglected. Try it out, maybe it'll become your everyday hair routine.
DIY: Neon Toe Shoes
Oh my, how beautiful! Instead of spending a lot of money on buying, why not take 5 minutes and make them? And then also saving money? To make everything more funny & interesting, try to paint some patterns. Like polka dots, or stripes. After that, wear proudly your art pieces.
Supplies: shoes, some paint spray and tape. Take the tape and stick it where you want the color to end. After that carefully spray on that section. Let it dry, and done! If you want some dots or stripes, use paint & a brush.
Low Side French Braid
Hey guys! I hope you like the new things that I've added to the blog. First the new navigation bar, looks nice right? And then there's an image slideshow. There's a problem with it, so please don't try to click on the pictures. They are not linked, so go and look for the post in the archive, or use Blogger search. Until I fix that, tell me what you think about it?

This hairstyle is so easy to make for those who know how to make a simple french braid. It can also be an low updo. And it's really romantic and casual. The best thing is that you can make it with medium length hair. Thank you Maegan from ...love Maegan. This tutorial is amazing!
Preparation: The most important thing about this hairstyle is texture. After you wash your hair, let it air dry, so it'll be all fluffy. Also curl a little side of your hair, for the effect. Don't forget to follow the video properly.
Messy French Roll
Have you ever tried to make a french hair roll? This hairstyle is a little bit hard, and if you get confused, I recommend for you to consult with your hair stylist. But, If you think you have the skills required, here we go!
Prepare yourself by good brushing your hair before you start. Then, take your hair and make a pony (don't tie it). Start by twisting and warping you hair up. Switch the remaining of your hair to the other side and pin the hair roll (so you could let go the remaining and pull some hair from your french roll). Tease it and style the way you want your french roll to look. To secure everything, pin some hair at the sides. And for the finish - add some strong but flexible hairspray.
Prepare yourself by good brushing your hair before you start. Then, take your hair and make a pony (don't tie it). Start by twisting and warping you hair up. Switch the remaining of your hair to the other side and pin the hair roll (so you could let go the remaining and pull some hair from your french roll). Tease it and style the way you want your french roll to look. To secure everything, pin some hair at the sides. And for the finish - add some strong but flexible hairspray.
Hunger Games - Katniss Everdeen Inspired Braid Tutorial
Hey guys! I must say, I'm a big Hunger Games fan! Since I started to read the books, actually just finished "Catching fire", I became obsessed. So I decided to post a tutorial for the braid that Katniss wore in the Arena. This braid is most known as a dutch braid, the only difference is that it's curved.
Step 1: Take three sections of your hair.
Step 2: Take the first strand and pull it under the first strand.
Step3: Take the third strap and pull it under the first strap.
Step 4: Add hair to the second strap.
Step 5: Once you add hair to the second strap, you're going to pull it under the third strap.
Step 6: Add hair to the first strap. Add hair into the straps you're holding between your fingers. Then bring that under the braid.
Step 7: Keep adding hair to each strap, like you would do for a french braid. Pull the straps under the braid and over. You are basically reversing a french braid.
Continue like that and you're finished! This braid is truly amazing!
Curly Side Waterfall Braid
Here comes another waterfall braid! But, who doesn't love braids? Especially if they are curly and loose. The best thing about these braids is that the technique is very easy to achieve and they don't take a lot of time. You cant wear it for almost every event, ans easily combine clothes. Get ready for this fantastic & romantic side braid.
Begin by curling all of your hair loosely with a flat iron. Then backcomb all of your roots to add body and extra grip for the bobby pins. Section out the hair on the heavy side from your ear forward and clip it aside for later. Take the rest and put it in a low side ponytail. Only pull the hair halfway through the pony the last time to create a loop. Use your fingers to scrunch up and spread out the curls around the loop, bobby pinning the hair in place to create a messy bun. Let down the remaining hair and do a loose waterfall braid, drape the end of the braid across the top of the messy bun and secure it with bobby pins and finish with hairspray.
Overlapping Half-Up, Half-Down Hairstyle
Summer is in full swing and everyone is looking for a fresh trendy hairstyle. The last thing you want to do is add more heat to your hair during these hot months and this striking style is perfect regardless of whether your hair is thick, thin, straight or wavy. Plus, the overlapping technique is so easy to achieve! So give this stunning look a try!
Step 1: Take a small strand of your hair from above the ear.
Step 2: Take a bobby pin and pin it 3/4th's of the way down your hair strand.
Step 4: Take the second strand and pin it under the first strand.
Step 5: Take a new strand from under the first strand and pull it over the second strand. Then bobby pin the third strand right under the second.
Repeat this 2 more times until you achieve this look. Make sure that everything is tight. Have fun!
Step 1: Take a small strand of your hair from above the ear.
Step 2: Take a bobby pin and pin it 3/4th's of the way down your hair strand.
Step 3: On the other side, pull a small strand of about the same amount as your last one. And pull it opposite direction as the first strand.
Step 4: Take the second strand and pin it under the first strand.
Step 5: Take a new strand from under the first strand and pull it over the second strand. Then bobby pin the third strand right under the second.
Repeat this 2 more times until you achieve this look. Make sure that everything is tight. Have fun!
Low Bun
This is the perfect season for messy beach hair and easy elegant buns. So when you're getting ready for a night out, don't forget to try some beautiful bun tutorials. And have a lot of them in my blog archive! But most of them are from a Beautiful Mess and so is this one! It's simple and looks fantastic!
Start by separating a few stick strands from the top of your head and tease them by brushing the hair up toward your head. Then pull your hair down, styling it into a low pony. Fluff up the teased part of your hair. Now use a hair tie to keep it in place. Separate the hair of your pony tail in a half, tease the upper half. Use the lower half (the unteased hair) and flip over the top or your teased bun. Warp the hair around the base of the bun and pin it. At the end, style any loose strands.
Happy 4th Of July!
Happy Independence Day to all of you! Even thought I'm not celebrating it, I seem to like the holiday very much. So, I've found some amazing hair tutorials for this special day. And also wanted to share some very yummy summer treats that I'm about to try today!
First of, here is the Firecracker Ice Pops recipe by Martha Stewart! They look so delicious and sweet!
And here's the list of Independence Day hairstyles that you can try. I've chose the three very simple and cute tutorials. As you can see, everything includes braids. I think they are very appropriate for holidays. First there's the fishtail braid. I really like them and they are easy to make. Second, there's the waterfall braid. And at the end, there's the third one - one side braid-bun. Sadly, I don't have that hair tutorial in my blog archive, so try something similar here!
Happy holidays friends!
Style A Beehive
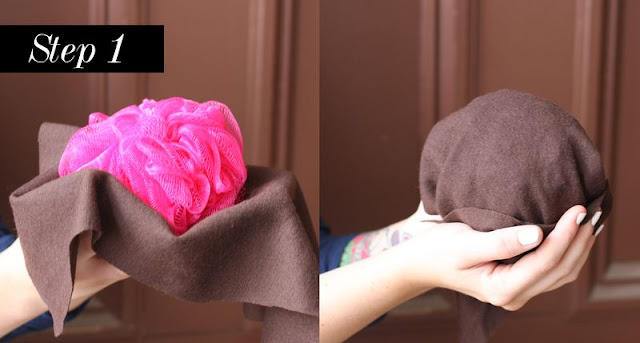
Well here's a very beautiful 1960' inspired hair tutorial. When I say beehive, it automatically reminds me on the girl who marked it - Amy Winehouse. I really respect her work and love some of her songs, like "Valerie". But this post is about the amazing beehive hairstyle. Honestly, it's not that hard when you're having the right supplies. The supplies needed: a bath loofa ( any color ), a piece of fabric that matches the color of your hair ( large enough to cover you loofa ), a rubber band, bobby pins and hair spray.
Step 1: cover your bath loofa with a solid fabric that matches your hair color.
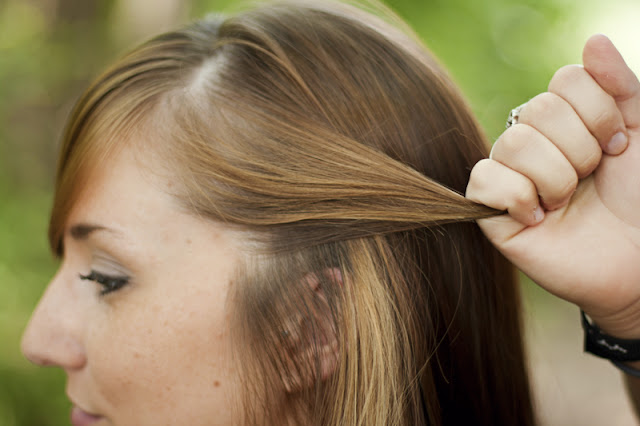
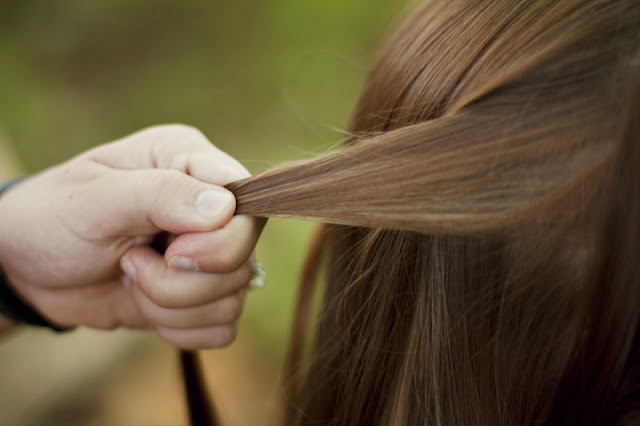
Step 2: pull one small section of hair forward ( leave unteased ). Gather a 1-2 inch section, spray and back-comb it. Repeat with 2-3 more sections.
Step 3: Add the loofa to your hair. Wherever you position the loofa will be where the bump sits. Cover it with pieces of hair and pint each one down. Continue to cover it from every direction untill the loofa is completely hidden.
Step 4: pull the pieces from the sides of the hair back to cover the sides of the bump.
Step 5: choose to pull the back of the hair up or leave it down ( Amy Winehouse style)! And done! This tutorial is very easy and beautiful! Have fun!
Credit: to my favorite blog - a Beautiful Mess. I just love them and their new design! xxx
Subscribe to:
Posts (Atom)


.jpg)


